Top DevOps Interview Questions for 2020

If you are looking for DevOps Interview Questions and answers, you are on a Right page and below are the 2020 Real-time DevOps Interview Questions. Go through all of them and Crack your Interview

Before diving into Interview questions learn more about DevOps by our blog What is DevOps?

1. What is DevOps?

The Term DevOps was Initiated by combining Operations and Development teams. DevOps is a mix of tools, that guide automation of complete Infrastructure. It is a mindset of IT, and it encourages, the communication and automation between developers and Certain IT operations.

2. Why do we need DevOps?

To get fast application development, and to meet the Requirments of users. DevOps is motivated by all agile processes, for automating the development, and operation processes. It helps in Delivering continuous applications to the end-users, for getting more benefits.

3. What are the Adoptions in DevOps Industry?

1. Take a Smart Approach to Automation.

2. Emphasize Quality Assurance Early.

3. Adopt Iteratively.

4. Understand and Address Your Unique Needs.

5. Make the Most of Metrics.

6. Embrace a DevOps Mindset.

4. What are the key aspects of DevOps?

1.Automated Delivery Pipeline.

2.Configuration Management.

3.Regular Integration.

4.Automated Monitoring & Health Checks.

5.The Firefighter Role.

6.Infrastructure as Code.

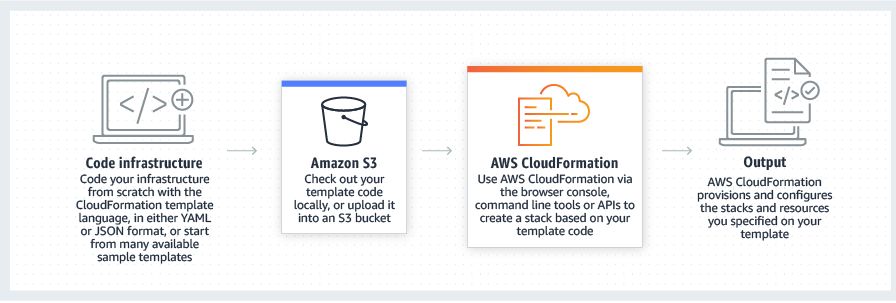
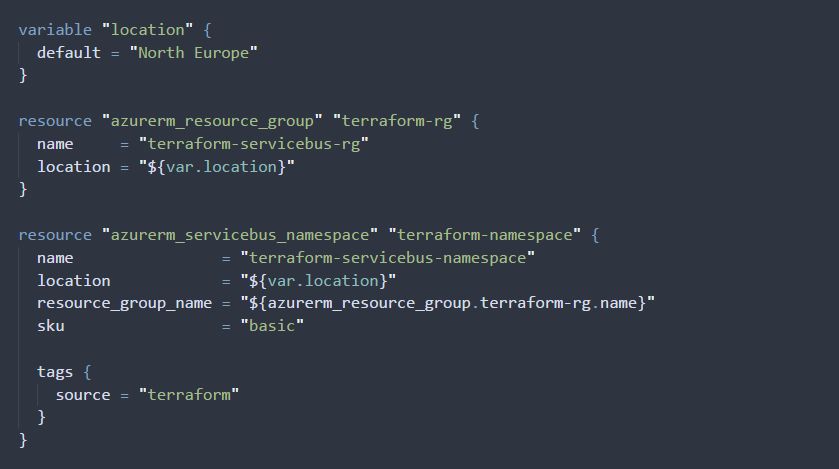
5. How would you explain the concept of “Infrastructure as Code”?

Infrastructure as code is the way how we manage Infrastructure, products such as Connection topology, Load balancers, Virtual Machines, Networks, with a Descriptive sample. That is by using the same version as DevOps, the team uses like source code. Infrastructure as code is defined to solve the issue of Environment.

6. What is the use of a chef in DevOps?

The chef is the best configuration management tool, to deal with machine setup on servers, virtual machines and in the cloud. So many companies utilize chef, software to manage their Infrastructure, that contains Facebook. The chef is made of ruby and Erlang programming languages.

[ Related Article – Explain Chef and its components? ]

7. What is the purpose of Git?

The main purpose of Git is to handle a project, with a combination of files, as they turn over time. It stores this information in a Data Design known as Repository. Git has a set of commit objects. It belongs to the third-generation version control tool.

                                                                              [ Related Article – Git]

8. How DevOps is Helpful to Developers?

It helps Developers to make fast decisions and complete Applications that a user needs. DevOps is a mix of tools, so many developers analyze the data by using this tool to get accurate data and complete the task in Specified Time. Developers get more benefits by using DevOps.

9. Name the popular scripting language of DevOps?

Python

10. Name some Agile Methods in DevOps?

1.Test-first programming.

2.Regular refactoring.

3.Continuous Integration.

4.Simple design.

5.Pair programming.

6. Sharing the codebase between programmers.

7.A single coding standard for all programmers.

8.A common “war-room” style work area.

11. Name some DevOps Tools?

1.BitBucket.
2.Sentry.
3.GitHub.
4.Ansible.
5.Vagrant.
6.Nagios.
7.Phantom.
8.Docker.
9.Jenkins.
10.Slack.

                                                                                    [Related Article – What is DevOps Tools?]

12. What is Scope for SSH?

SSH is simply restricted, we won’t allow Running “apt for getting an update” or “apt-get install”. We apply Ansible Recipes, to provision your environment, from scratch, we can not provide complete SSH Access.

13. What are the Benefits Of Devops With reference to Technical And Business Perspective?

1)Technical Benefits:

a) Software Delivery is continuous.

b) Reduces Complexity in problems.

c)Faster approach to resolve problems

d)Manpower is reduced.

2.Business Benefits:

a)Stable operating environments.

b)Advanced Communication and Collaboration.

c)Fast Delivery of Business Features.

14. What are Anti-patterns of DevOps?

1.DevOps Isn’t Feasible with Legacy Systems.
2.DevOps Gets Rid of Operations.
3.DevOps and Security Are Foes.
4.DevOps Is Only About Automation.
5. You Need a Dedicated DevOps Team.
6.DevOps Is All About the Tools.
7. Agile and DevOps Are the Same.
8.DevOps Is Merely Merging Development and Operations Teams.

15. What is the Role of AWS in DevOps?

When the interviewer asks this question, go directly by explaining about AWS is a cloud service from Amazon, that makes sure scalability with computing and storage. with AWS, any company can develop and offer complex products and move applications on the cloud.

                                                                                                    [ Related Article – Why AWS for DevOps? ]

16. What challenges exist when creating DevOps pipelines?

New features and Database migrations are some challenges in DevOps Pipelines. Features Flags are a simple way to deal with Incremental Product releases, which are Inside CI Environments.

17. What is CAMS in DevOps?

Culture.
Automation.
Measurement.
Sharing.

18. What is kubectl?

It is a Command-line Interface, for running commands on Kubernetes clusters. Where ctl is “control”. Kubectl used to Deploy apps, check and handle clusters.

19. How to Conduct an incident post-mortem for ongoing DevOps improvement?

An incident occurs when a software performance changes from the expectation. The post-mortem is defined by certain root cause analysis, there is no single approach for post-mortem. The elements vary from simple to highly formal, that depends, how big the business is.

Achieve your dream to become a DevOps Engineer through DevOps Online Training

Kubernetes in DevOps Space: Everything You Need To Know

It can be rightly said that Kubernetes and DevOps are the power couple of clouds! They run hand-in-hand for the enterprises that are looking to develop complex applications. You may be thinking that, both DevOps and Kubernetes have a different context, how this is possible?

What is DevOps?

Today, Software delivery cycle is getting shorter and shorter, while on the other hand application size has been getting bigger and bigger. Software developers and enterprise looks for a simpler solution. Hence, there came a process called DevOps which is solely dedicated to supporting software building and delivery.

Its main goal is to unify application development and its operations throughout the software development life-cycle from strategy, planning, coding, building and testing through deploying, operating and monitoring. DevOps tools automate tasks and manage configurations at a different stage of configuration delivery.

Get hands-on experience on DevOps from live experts through DevOps Online Training

But the real challenge exists when the application becomes more micro and diverse. So, how DevOps helps to build and deliver, larger and complex application to the user?

Thus, to go in-depth, we need to add another Swiss-army tool to our kitty i.e. Container.

Before straightly jumping to the Kubernetes, let’s understand the gist about the containers.

Quick Overview About Container

Containers make it easier to host and manage life-cycle of web applications inside the portable environment. It packages up application code other dependencies into building blocks to deliver consistency, efficiency, and productivity. Docker is a tool to deploy containers inside the cluster and treat it all as a single unit.

Container and DevOps have although different concepts; they are totally the different things but are part of the same conversation.

But, the real challenge is deploying the multi-container application as multiple applications can’t just live in one container. And what if there is a need to scale out service as per the business needs? What to do to provide services across multiple machines without dealing with cumbersome network and storage settings? That’s how Kubernetes came into play!

What is Kubernetes?

Kubernetes is an open source container orchestration platform, enabling multiple numbers of containers to work together in harmony, reducing operational burden. It manages application containers across multiple hosts.

Features like auto-scaling, rolling deployment, computer resource, volume storage to the name of few are some of the exceptional weapons of Kubernetes. Similar to containers, it is designed to run on bare metal, in the data center, public cloud or even a hybrid cloud.

So, How Kubernetes Can be a Strength For DevOps?

With the help of Kubernetes, developers can share their software and dependencies easily with IT operations. It minimizes the workload and solves the conflicts between different environments. Container Orchestration bring IT operations and developers closer together, making it hassle-free for the team to collaborate effectively and efficiently with each other.

Kubernetes provide the tool for the developers that respond to the customer demands while relying on the cloud for the burden of running applications. This is done by eliminating the manual tasks that are related to deploying and scaling containerized applications so that it enables to run software more reliably when moved from one environment to another.

For instance, it is feasible to schedule and deploys any number of containers onto a node (across public, private or hybrid clouds) and Kubernetes manages those workloads enabling you to do what you intended for. With the help of Kubernetes, container tasks are simplified including the operations like horizontal auto-scaling, rolling updates, canary deployment etc.

Hence, opting for the Kubernetes workflow can simplify the build/test/deploy pipelines in DevOps.

How Kubernetes Can Help Different IT Operational Team?

Kubernetes is all about portability; giving the flexibility to be a platform agonistic on any level whether it’s a language, technology or the platform itself.

  1. Developer: Build once run everywhere
  2. QA/Testing: Reliable and coordinated environments between test and production
  3. Sys-admin — Config once, run anything
  4. Operational team: Unified solution for building, shipping, and scaling software. Enables to focus on features, bugs and shipping better software rather than setting up and maintaining environment and tools.

Kubernetes helps to reduce config-variables and time-consuming setup and maintenance task which are boon for developers, sys-admin and other teams. It can be proved to be a game-changer for QA and testers because it reduces risk and increases efficiency. This container orchestration technology increases the competence and eliminates the risk by ensuring that the system configuration of the test environment is identical to the production environment.

Kubernetes is much needed in today’s software development culture because the shift of the digital wave has made software architecture much complex, written in various technologies and run on multiple environments followed by many iterations. It manages this consistency, be its infinite loop of technologies and environments.

Get hands -on experience on Kubernetes from live experts at DevOps Online Course

So, on a brighter note, Kubernetes is one of the best container orchestration technologies for achieving DevOps enabled culture.

Kubernetes Improves Continuous Integration/Continuous Delivery

CI and CD are the two different acronyms that are often mentioned when people talk about modern development practices. They are like vectors; having the same direction but different magnitude. Their goals are the same; making software development and release process faster and robust. Tools like Jenkins have redefined CI/CD by automating various steps in the development cycle in terms of speed, precision, repeatability, and quality. With the advent of a Docker container, it has left no stone unturned to provide continuous integration/continuous delivery in the world of software development.

The rise of Kubernetes within the container ecosystem has impacted the CI/CD process. Instead of shifting code between different virtual machines in different environments, the same code can be moved across container clusters with Kubernetes. The previous versions provided a static virtual machine which is preferable for monolithic architecture and container orchestration requires a Microservice model. These rings-in new opportunities in terms of elasticity, high availability and resource utilization. However, the old approaches and tools don’t offer enhanced CI/CD which calls for Kubernetes.

The Benefits Kubernetes Have Stored-in To Enable DevOps Workflow Easy Which Includes:

  1. Hassle-free solution for making development, testing and production environment consistent: When an application is written, tested or deployed inside the container, the environment at different parts of delivery doesn’t change. This eases up the collaboration between different teams i.e. testers, admin, developers etc enabling the team to work in the same containerized environment.
  2. Provides simple updates: Delivering software continuously calls for the application updates on a constant and streamlined basis. Kubernetes can help with it, as container orchestration can be easy to apply any updates to the application. When your app is redistributed into multiple Microservices, each one is deployed in a separate container and updates can be made in some part of the app without disturbing the rest of the app by restarting the container.
  3. Support for multiple frameworks: When DevOps approached is followed, containers can easily switch between different frameworks or deployment platform. This happens because container orchestration is agnostic towards platform, languages etc.; this means any type of app can be run inside the container. Moreover, it is also hassle-free to move containers easily between different types of the host system. For instance, if you want to move from Red Hat to Ubuntu, it is easy to move that with containers.
  4. Offers Scalability: The container-based autonomous continuous integration ecosystem has the ability to scale up or scale down the application based on the load. This nature ensures instant feedback once a commit is made to the repository.
  5. Less time is taken to the onboard new application: Reduces the time to onboard new projects; Kubernetes can accommodate new loads and the reusable pipeline as code modules that can be shared across projects.
  6. Increase in developer’s productivity: Developers do not have to wait in the queues to receive feedback on the builds. The Pipeline as code provides important convenience and productivity which enables them to define CI configurations alongside code in the same repository.
  7. Solving Infrastructure problems: Managing manual infrastructure process causes headaches for coding teams because someone has to remain alert in case of any mishap happens. Issues like power outages, unforeseen traffic spike etc are likely to arise. In such circumstances, if your app is down, you may suffer a heavy loss. But, with Kubernetes, you can automate patches and update to solve these problems.
  8. Server usage efficiency: If your apps are not packed efficiently onto servers, you need to overpay for the heavy load. This is true regardless you are running your application on-premise or on the cloud. Kubernetes increases the efficiency of server usage and ensures that you are not under-doing or increasing the load.

Other Benefits

  1. Deliver the software quickly with better compliance
  2. Drives continuous enhancement
  3. Increase transparency and collaboration amongst the team who is involved in delivering software
  4. Effectively minimize security risk while controlling cost

Get practical benefits from live Experts at DevOps Training

Considering The Hurdles…

Despite hundreds of benefits, there is always ‘but’ that changes the scenario… Kubernetes is relatively difficult to set-up and managing Kubernetes calls for the highly-skilled resource. To the untrained eye, Kubernetes looks simple and can think of running in hours or days, but in reality, additional functionality is needed i.e. security, high availability, disaster recovery, backups, and maintenance — everything you need to make production ready. The organizations that are looking to opt for Kubernetes need to think of highly skilled resource to give an edge to their business. If the highly skilled resource is not the feasible option, an organization can opt for Kuberznetes management platform which is developed to simplify Kubernetes management even if your system is rigid.

Things to Take Care While Choosing Kubernetes Management Platform

  1. Select the platform which is production ready and fully automates configuration without any hassle.
  2. Select the platform which supports multi-cloud strategy and helps the app to run anywhere without hosting new environment
  3. Select the platform which incorporates automated intelligent monitoring and alerts
  4. Select the platform which provides dynamism, flexibility and unmatched transparency between modules
  5. Select the platform that can assure support and training.

Wrapping it up…

Kubernetes is the best way to keep the development agile and ensure continuous delivery; hence it is one of the blessed things amongst developers. For organizations using container orchestration technologies, product development is defined by Microservice architecture. The organization must understand how DevOps and continuous development process enable the creation of an application that end users truly find it useful. Kubernetes has changed the way how software is developed and shipped; Kubernetes is delivering what it really matters; making CI/CD becoming reality for many of the organization.

Until now, you may have got the clear picture of how Kubernetes can help DevOps in simplifying the operations. Still, if we are missing anything or have concerns about it, you can tell us in the comment section.

Know information from live experts at Best DevOps training Online Course

What is AWS VPC?

Few of us could have predicted that data breaches would become so common and part of the major news cycle. It almost seems like there are leaks reported on a daily basis, such as compromised accounts on Facebook or credit card account leaks from major companies. With the proliferation of web and mobile apps in high abundance, there is also a constant stream of negative press related to criminals breaking into company data stores.

Fortunately, there’s one smart option for those who are concerned about deploying a new website, application, or cloud service and how that could open up an attack vector.

AWS VPC (Virtual Private Cloud) provides an isolated and secure virtual cloud for companies to deploy websites, apps, and other services. It’s a private, provisioned portion of the Amazon virtual cloud and has the extreme flexibility and scalability to help a tiny startup launch a new website or a massive enterprise deploy a new web application.

Get hands-on experience on AWS VPC through AWS Cloud Architect Training

Security is a primary reason to use AWS VPC, but there’s also the flexibility to configure the virtual cloud the way you need to run it. This can include using either IPv4 or IPv6, setting your IP address range, creating subnets, and configuring gateways and route tables.

One example of how this works is with subnets. A large company might decide to use VPC because they have public-facing and private-facing applications. Launching a new rich application for consumers, they might create a subnet that is still secure and reliable. Yet they might also need a second subnet, configured according to their technical requirements, that is not available to consumers nor over the public Internet.

The private subnet might be intended only for a legacy backup system or a secure database used only by internal employees who access the server over a private network and not the internet. This type of control over what your web server in the cloud can do, for both public and private applications, means you can take control of your security infrastructure.

Within the subnets, you can use EC2 (Elastic Compute Cloud) instances that you deploy and control instead of relying on a data center at your own site and having to configure, maintain, and update the IT infrastructure for your various apps and data stores.

Because the VPC is all part of Amazon Web Services, you also can deploy Amazon S3 (Simple Storage Service) within each instance, and even restrict which AWS account can access the subnets. One way to understand how this all works and the benefits is to think of VPC as a private container for your web apps, each one secured and restricted in a way that reduces the chances of a data breach. You’re in full control of where the data resides within your own private cloud, which instances are deployed, and how the storage is configured.

Benefits and examples of AWS VPC

Because of all the flexibility in having your own AWS Virtual Private Cloud, companies can scale and deploy business apps and reach an audience faster, without the typical concerns over data breaches and configuring the infrastructure. Companies can deploy the VPC right from the AWS Management Console. This is all template-driven so that you can focus more on the apps, your database, and your new website rather than the complexity of configuration and setup.

As with many Amazon Web Services, the VPC also helps you reduce the costs associated with a private cloud. One example of this is when a company is faced with the need to deploy a secure disaster recovery portal. In the past, creating the infrastructure for disaster recovery is a major undertaking, especially when there are complex regulations and compliance issues involved. It is often an expensive, time-consuming endeavor. Companies know they need to plan for a major event that is weather-related (e.g., a tornado that destroys local servers) or some other catastrophic event, but actually doing so is not an easy process.

With VPC, you can use your own private cloud as a disaster recovery site for a much lower cost than doing it on your own with a second data center location. You also have the benefit of using EC2 instances to add compute performance if the primary infrastructure is not available. There are additional benefits related to extending the compute performance of an existing data center or server room, even for companies with an extensive array of web servers.

One last example of how a company might use VPC is for experimentation. Deciding to launch a new website is not typically something you can do overnight. Yet, even a small company can create business requirements, build the features and functions, and then rely on a virtual cloud for running the application without having to first make it secure and reliable.

Know more information on AWS VPC through AWS Solution Architect Training

How to set up an Angular CLI project with Docker Compose

Introduction

In this post I would like to give a quick introduction about how to get your Angular project running in Docker. When developing our application locally, the expectation is that the container will reload our new application just like you are used to when developing locally.

This solution will work on existing angular projects as well as on new projects.

We will start of with creating a Dockerfile and use the Docker Compose tool to run our service.

What are we going to do

This post will guide you all the way from creating an Angular project with the CLI to a Docker setup, including reload on file changes.

In order to do so, we need the following prerequisites as displayed bellow.

  1. Node 8+
  2. Angular CLI
  3. Docker V18+
  4. Preferably a Linux OS, but Mac will do as well. I won’t encourage Windows.

Get hands-on experience on Docker CLI from live experts at Best DevOps Training Online

Installing Node on your machine

This post won’t cover how to install Node, but here is a link to the official download page.

https://nodejs.org/en/download/

Installing the Angular CLI

The first step is to install the Angular CLI on your local machine. The Angular CLI is the command line interface that provides multiple useful tools including creating new projects, components and services.

npm install -g @angular/cli 

Create a new project

Create a new project.

ng new angulardockerproject

navigate to the project folder.

cd angulardockerproject

The Dockerfile

To run a Docker container we need an image. This image is defined in a Docker file.

In the Docker file we can use the following instructions:

FROM,WORKDIR ,COPYRUNENVEXPOSECMD

Docker then, will read these instructions to build a Docker container, but we’ll get to that later.

Lets create one in the project folder.

touch Dockerfile

Within this Dockerfile, we will define the Docker image. In order to do this we need to add a starting point, which is another image. To define a starting point we use the FROM instruction, followed by the image we would like to use.

To use an empty image we could use “FROM scratch”, but we will use the Node:8 image because that is exactly what we need for our Angular environment.

# This defines our starting point
FROM node:8

Amazing, we’ve defined our starting point. Let’s define an instruction to create a working directory for our app. First we need to create a directory with the RUN instruction, after that we will make that our working directory using the WORKDIR instruction.

RUN mkdir /usr/src/app 

WORKDIR /usr/src/app

Now we have defined our directory, we are ready to install the Angular CLI, lets do that right away. The node image provides us with NPM, which means we can install NPM packages with the RUN command.

RUN npm install -g @angular/cli 

The next thing we need to do is to copy our Angular application to our Docker instance. We can do that using the COPY instruction. The copy instruction uses two paths as parameters similar to the CP command.

COPY . . 

That’s it, that is the Dockerfile for now. It is the bare minimum but it should be enough for our example.

Lets test our Dockerfile by building it.

docker build -t testimage .

To see our image(s) we can use the following command.

docker images

For now, we will remove our image again. Because we are going to build our image with Docker compose. Removing the image is simple, check your IMAGE ID that you can see in the Docker image output.

Image id’s look like this: d304814c7120

docker image rm <your image id>

The docker-compose file

A Docker file is enough to build, but we want to be able to start multiple containers with one file. For example, if we also want to add our Node Express back-end application and our database which all contain their own Dockerfile, we could manage them within a single configuration.

This is where we can use the docker-compose tool.

Docker compose is a tool which reads a docker-compose YAML file to start your application services.

Lets create one outside our Angular project folder.

cd ../
touch docker-compose.yml

A Docker compose file starts of with the version of the configuration file that we are going to use.

version: '3.5'

Below the version we start defining our services. Our service will be called angular-service.

Here we also need to define the container name we generate with the CONTAINER_NAME instruction and the build location of our Dockerfile with the BUILD instruction.

Next we map our volumes from our local directory to the directory that we make in our environment with the VOLUMES instruction.

Then we specify on which port we want to run our application and what port we have exposed in our Dockerfile with the PORTS instruction.

version: '3.5' # We use version 3.5 syntax
services: # Here we define our service(s)
angular-service: # The name of the service
container_name: angularcontainer # Container name
build: ./angulardockerproject # Location of our Dockerfile
volumes: # Volume binding
- './angulardockerproject:/usr/src/app'
ports:
- '4200:4200' # Port mapping
command: >
bash -c "npm install && ng serve --host 0.0.0.0 --port 4200"

The COMMAND instruction is a way to instruct Docker to run npm install and ng serve. This is one way to do it, I will use this example for now but there are other ways to install the node packages and run the application.

The following command opens bash in the running container:

docker exec -i -t container_name /bin/bash

In this container you could also install the node packages and serve the application.

Run docker compose

Run the docker-compose.yml file by the following command. We use the build parameter to build the image we defined in our Dockerfile if it not exists already. I like to use the -d parameter to run docker in the background.

docker-compose up --build -d

How to monitor what is happening

To see which Docker containers are running, we can run.

docker ps

To see all of the images that are built.

docker images

To stop a container, we can use.

docker container stop angularcontainer

Conclusion

In this document we learned how to create a Dockerfile to define our image(s). How to use docker compose to run our container and we learned how to monitor our running containers.

Know more information from live experts at Best DevOps Course Online

Explain about AWS Pricing?

Amazon Web Services (AWS) helps you move faster, reduce IT costs, and attain global scale through a
broad set of global compute, storage, database, analytics, application, and deployment services. One of
the main benefits of cloud services is the ability it gives you to optimize costs to match your needs,
even as those needs change.
AWS offers on-demand, pay-as-you-go, and reservation-based payment models, enabling you to obtain
the best return on your investment for each specific use case. AWS services do not have complex
dependencies or licensing requirements, so you can get exactly what you need to build innovative, costeffective solutions using the latest technology. In this whitepaper, we’ll provide an overview of how
AWS pricing works across some of our most widely used services.

Get hands-on- experience of AWS pricing from live experts at AWS Online Training Course

Key Principles
While pricing models vary across services, it’s worthwhile to review key principles and best practices
that are broadly applicable.
Understand the fundamentals of pricing
There are three fundamental drivers of cost with AWS: compute, storage, and outbound data transfer.
These characteristics vary somewhat, depending on the AWS product and pricing model you choose.
In most cases, there is no charge for inbound data transfer or for data transfer between other AWS
services within the same region. There are some exceptions, so be sure to verify data transfer rates
before beginning. Outbound data transfer is aggregated across services and then charged at the
outbound data transfer rate. This charge appears on the monthly statement as AWS Data Transfer Out.
The more data you transfer, the less you pay per GB. For compute resources, you pay hourly from the
time you launch a resource until the time you terminate it, unless you have made a reservation for
which the cost is agreed upon beforehand. For data storage and transfer, you typically pay per GB.

Start early with cost optimization
Adopting cloud services is not just a technical evolution. It also requires changes to how organizations
operate. As you move from IT being treated as a capital investment that happens periodically to a world
where pricing is closely tied to efficient use of resources, it pays to understand what drives cloud pricing. so you can build a strategy for optimizing it.

When it comes to understanding pricing and optimizing your costs, it’s never too early to start. It’s
easiest to put cost visibility and control mechanisms in place before the environment grows large and
complex. Managing cost-effectively from the start ensures that managing cloud investments doesn’t
become an obstruction as you grow and scale.

Maximize the power of flexibility
AWS services are priced independently and transparently, so you can choose and pay for exactly what
you need and no more. No minimum commitments or long-term contracts are required unless you
choose to save money through a reservation model. By paying for services on an as-needed basis, you
can redirect your focus to innovation and invention, reducing procurement complexity and enabling
your business to be fully elastic.
One of the key advantages of cloud-based resources is that you don’t pay for them when they’re not
running. By turning off instances you don’t use, you can reduce costs by 70 percent or more compared
to using them 24/7. This enables you to be cost-efficient and, at the same time, have all the power you
need when workloads are active.

Use the right pricing model for the job
AWS offers several pricing models depending on product. These include:
• On Demand means you pay for compute or database capacity with no long-term commitments
or upfront payments.
• Dedicated Instances (available with Amazon Elastic Compute Cloud (Amazon EC2)) run in a
virtual private cloud (VPC) on hardware that’s dedicated to a single customer.
• Spot Instances are an Amazon EC2 pricing mechanism that lets you purchase spare computing
capacity with no upfront commitment at discounted hourly rates.
• Reservations provide you with the ability to receive a greater discount, up to 75 percent, by
paying for capacity ahead of time. More detail is provided in the section, “Optimizing costs with reservations.”

Know more information of AWS pricing from AWS Online Training Hyderabad

What are the popular Github Actions?

I have been diving deep into Github actions for about a month now and they are wicked good! They allow you to run any sort of arbitrary code based on events in your repo, webhooks, or schedules. They are very reasonably priced. The interface that GitHub hs developed for them is top-notch! It’s so good I have done 90% of my editing of them right from github.com.

TLDR

interactions to your repository triggers code to run.

Online Editor

The online editor for actions is pretty amazing. When creating a new workflow it automatically sets up a new blank workflow or a workflow from the marketplace for you in your .github/workflows directory. This is all it takes to get an action running, a yaml or yml file in the .github/workflows directory.

Get practical knowledge on all Git hub actions through Best DevOps Training Online

github actions online editor

The editor does a great job of detecting syntax errors, misplaced keys. It also does a great job at autocompletion. As you type it will suggest keys that are accepted by the workflow syntax. There is an embedded side pannel with docs and the marketplace to the right.

Event Triggering

see this article from GitHub for a full set of details: https://help.github.com/en/actions/reference/events-that-trigger-workflows

You can trigger actions to run based on about any interaction with the repo that you can imagine, push, PR, webhooks, follows, create a branch, delete a branch, deployment, fork, wiki, issues, comments, labels, milestones, just check out the GitHub article for the full list.

push/pr

The most common and default trigger you will come across is the on push. This means that on every push/pull_request the given action will run. This is typically at the start of the file and will trigger the workflow for the whole file.

# Trigger the workflow on push or pull request
on: [push, pull_request]

You can also filter to only run on specific branches. You probably only want to run your release workflow on the master branch, but want linting and testing on all branches.

push:
  branches:
   - master
pull_request:
  branches:
    - master


schedule

It is also possible to set up your workflows to run on a schedule. I have set a few of these up myself to do things such as updating/auditing npm dependencies and checking if the site is up.

on:
  schedule:
    # * is a special character in YAML so you have to quote this string
    - cron:  '*/15 * * * *'

watch

One issue that I have with GitHub actions is that there really isn’t a good way to manually run workflows. A workaround I found is that you can run a workflow when the repo is starred.

on:
  watch:
    types: [ started ]

If you have a public repo with some traction, you might want to avoid this hack, but if you did want to use it on a repo that may potentially get some stars randomly make sure that you filter to only your stars.

on:
  watch:
    types: [ started ]

jobs:
  run-on-star:
    runs-on: ubuntu-latest
    steps:
      - name: ✨ you starred your own repo
        if: github.actor == 'WaylonWalker'

Free for public repositories

GitHub offers quite a generous free tier to get you started.

gh-actions-free-tier

I think that GitHub’s pricing just shows its commitment to the open-source. Any public repo has unlimited build minutes! I believe this goes for not only Linux actions, but the more expensive windows and mac actions as well.

github actions free for public repos

Secrets

You will find that a lot of actions need things such as a GitHub personal access token. You may even be hitting a third party API such as twitter or Gmail that require an API key. These are things that need to be kept secret DO NOT put these as raw text inside your action. The first tutorial I followed to deploy to GitHub pages did this 🤦‍♂️ and I followed.

github built-in secret store

GitHub offers a wonderful secrets manager. From your repository go to settings > secrets. You can just add settings/secrets to the URL of your repo to get there as well. From there add a new secret. Now your secret is accessible by secret key using ${{ secrets.<your-key> }} from anywhere in your workflows yml file.

GitHub has done an amazing job at hiding these secrets. Anywhere that I have seen try to echo these secrets out into the console or anywhere just shows ***. I am not sure if you can 100% rely on this, but they appear to have done a good job with it.

Live Logs

One great feature of actions is the live logs. As you are developing them it is likely that you are anxiously watching them with anticipation. Watching those logs go, and turn green is a great experience.

github actions live logs

Marketplace

As with all things open source, much of the power of actions comes through the community and in actions case the marketplace. Reusable actions can be deployed to the github marketplace. Here they can be found from search, starred, and example workflows can be copied in one click.

github actions marketplace

I find that many times while I can write all of the code necessary in a shell script to do most of what I need, there is already an action in the marketplace that takes care of everything for me. In fact there are usually several to choose from.

#discuss

  1. What Actions are you excited about?
  2. Are you using actions today?
  3. What struggles have you encountered with actions?
  4. Do you like these silly image headers I used? Do they kill A11y? I attempted to use good alt text to counter.

Know more information from live experts at DevOps Online Course

What is an AWS IoT?

AWS IoT Core is a cloud platform by  Amazon Web Services, in which connected devices can interact with cloud applications, and other devices easily and in a secure manner. 

It helps many devices, send and receive messages, take actions and direct those notifications to endpoints and to other devices accurately and securely.

By using AWS IoT, our applications can maintain a record, and interact with all our devices even when they are not connected.

With the help of Amazon Web Services IoT, We can use easily Amazon Web services like AWS CloudTrail, Amazon CloudWatch, Amazon DynamoDB, Amazon S3, and Amazon Kinesis to create IoT applications that collect, operates, examine and act on data produced by connected devices without managing any framework.

Get practical knowledge on AWS IOT at AWS Online Training

How does AWS IoT Core Works?

  1. Connect and maintain your devices: 

AWS IoT Core makes us connect easily any number of devices to the cloud and to other devices. It helps Websockets, HTTP and MQTT, a less weight interaction protocol mainly built to handle disconnected connections, reduce the code in devices, and decrease network bandwidth necessities.

  1. Protect Device Connections and data:

Amazon Web Services IoT gives confirmation and completes encryption among all connection points. By which the data is never transferred, among devices and Amazon Web Services IoT without any proven identity.

We can also protect access to our devices, and applications by implementing policies with small permissions.

  1. Process and act upon device data:

Using Amazon Web Services IoT, we can separate, change, and take action on-device data on the fly, depending on the business rules we specify. 

We can update our rules to execute a new device, and application properties at any time. With Amazon Web Services IoT, it is easy to use Amazon Web services like Amazon S3, Amazon CloudWatch, Amazon DynamoDB, and Amazon Kinesis for powerful IoT applications.

  1. Read and set the device state at any time:

It saves the fresh state of a device, by which it can be read or fix at any time, enabling the device to display to our applications as online always.

Even if your application is disconnected, we can read the state of the device and can set the device state, and it is applied when the device connects again.

Features of AWS IoT Core:

  1. Alexa Voice Service (AVS) Integration:

Alexa integration is a group of devices, designed using Alexa Voice Service (AVS) which has a speaker and a microphone. We can communicate with these products directly, using the starting word “Alexa”, and get voice replies and text immediately.

  1. Rules Engine:

Rules Engine helps to create IoT applications that collect, process, examine and take action on data produced by interlinked devices, on a broad scale without managing any infrastructure.

  1. Device Shadow:

Using AWS IoT Core, we can design a constant, practical version, or Device Shadow, of every device that consists fresh state of the device.

By which the applications and other devices can read notifications, and communicate with the device.

  1. Registry:

The Registry starts an identity for devices and records metadata, like device features and abilities. It also gives a unique identity to every device that is continuously patterned, no matter how it connects and which type of device it is.

  1. Authentication and Authorization:

AWS IoT Core delivers common authentication and encryption, at every point of connection, so the data will not be exchanged between devices and AWS IoT Core without any proof.

  1. Message Broker:

The Message Broker is a high output or sub-message mediator, that transfers messages safely to and from all of our IoT devices and applications, with less latency.

We can send or receive messages from many devices, because of its adaptable nature.

  1. Device Gateway:

It serves as the starting point for IoT devices, connecting to Amazon Web Services. It manages all active device links and executes semantics, for different protocols to make sure that devices communicate with AWS IoT Core efficiently and securely.

  1. AWS IoT Device SDK: 

We can connect our hardware device or our mobile application to AWS IoT Core, easily and fastly with the help of Amazon Web Services IoT Device SDK. This also helps to connect, authenticate, and transfer notification with AWS IoT Core by using the HTTP, MQTT, or WebSockets protocols. 

In this article, I have shared about AWS IoT Core. Follow my articles, to get more updates on Amazon Web Services.

Know more information from live experts AWS Solution Architect Training

WHAT IS AWS CDK?

In this article we’ll introduce the AWS Cloud Development Kit and explore how it can boost the productivity of your development and infrastructure teams.

Infrastructure-as-Code is fast emerging as a de-facto standard for development organizations.

Having the power to specify your application’s infrastructure in a source-controlled language understood throughout your organization removes a lot of the traditional headaches that defined the line between software engineering and devops engineering. 

As cloud-based technologies have continued to expand, the tech that supports these cloud resources has continued to mature. This gives rise to the latest innovation in AWS resource management, the AWS Cloud Development Kit (CDK). Monitor your entire AWS serverless environment from a single view.

WHAT IS AWS CDK?

The AWS Cloud Development Kit is a framework that can be used by developers to provision and manipulate AWS resources programmatically. 

While many tools like Terraform and CloudFormation exist to give you programmatic access to your application’s resources, many are based in a series of formatted configuration files.

How CloudFormation infrastructure-as-code works.
How CloudFormation infrastructure-as-code works. Source: AWS.

These file configurations can – and often do – provide a wide range of flexibility and functionality. However, these specifications will rarely have the full capability of a traditional programming language. 

The CDK is available in Python and TypeScript as stable builds, and preview builds are available for Java and C#/.NET, allowing your developers to manage infrastructure in the languages that are most comfortable to them.

Get practical knowledge of AWS CDK from live experts at AWS Online Training

COMPARING AWS CDK TO SIMILAR PRODUCTS

As mentioned above, the AWS CDK is in many ways a layer on top of traditional means of managing infrastructure in code. 

CloudFormation and Terraform rely heavily on markup-based configuration, an approach that allows you to maintain your configurations as data objects. However, these markup languages can often fall short of your organization’s needs, as evidenced by the existence of tools like Serverless Framework, or even AWS’ own Serverless Application Module (SAM)

An example of using declarative infrastructure as code using Terraform.
An example of infrastructure-as-code using Terraform. Source.

While these tools provide power and control, improving the ability of a tech org to maintain and iterate on its own infrastructure, they’re by necessity limited in scope – both Serverless Framework and SAM were built with the needs of a serverless application in mind.

The AWS CDK builds upon this programmatic layer by greatly expanding the number of resources you can manipulate through your code base. Using AWS CDK, you can deploy your entire cloud stack from a small set of programmatic structures, using your engineering department’s strength in development to improve the quality and maintainability of your application’s infrastructure. 

As a first-party AWS product, AWS CDK will also allow you to streamline your costs through consolidation of effort – migrating from an existing infrastructure-as-code platform to an AWS CDK application that provides the same functionality reduces the risk vectors in your application’s deployment, minimizing costs while getting you closer to the AWS resources you are managing.

AWS CDK EXAMPLE USE CASES

To see the benefits offered by AWS CDK, we’ll look at a couple different use cases. These highlight the role that AWS CDK-based resources would play in a set of hypothetical web apps and microservices.

USE CASE 1: A SERVERLESS UTILITY FUNCTION

Utility functions often are the most susceptible to tech debt, as their very existence is intended to solve an internal problem that may not be directly linked to revenue and, accordingly, not assigned sufficient priority by your organization as it works to reach its goals. Generally, in serverless utility functions this problem was compounded by the need to incorporate a third party tool like Serverless Framework to manage your deployment and infrastructure configurations, requiring its own support contacts and having its own esoteric behaviors to be learned and documented. With AWS CDK, you can migrate your existing deployment and configuration scripts into a single code base, built in a common language, using structures and control flows designed as intended by the maintainers of the services you rely upon to run your application.

USE CASE 2: A CONTAINERIZED APPLICATION

Applications built using containerized architectures often need to rely upon several tools for deployment and maintenance. They’ll use one set of configurations to construct the containers needed for a particular service, another to deploy the application’s code and related microservices to the appropriate containers, and yet another to tie the disparate containers together into a cohesive whole. The AWS CDK allows you to move several of these indirection layers into code, as artifacts that defines your application rather than markup that describes it. Using the AWS CDK, you can build an infrastructure deployment library that allows you to represent the true interactions between each of your application’s containers, giving you the full power of your programming language of choice to define your application’s infrastructure.

USE CASE 3: A TRADITIONAL WEB APPLICATION

Adding AWS CDK to the mix can seem like a complication in a traditional web app environment,  given that often these can be rife with technical debt and one-off integrations that need a fresh set of eyes. There are a few ways in which it provides an immediate benefit, however. Through the AWS CDK, you can construct entire CloudFormation application architectures using only a few lines of code. As your organization no longer needs to create – or maintain – these often problematic configuration files, the overall size of your codebase will be smaller with vastly improved readability. Additionally, by moving this configuration into code, you’re able to better review, verify, and deploy your infrastructure, reducing the cost of spinning up additional supporting resources while also giving your engineers peace of mind when rebuilding your application stack.

MIGRATING CF TEMPLATES TO AWS CDK

Moving from CloudFormation Templates to AWS Cloud Development Kit will be the first step for many organizations making the switch. Generally, migrating these templates is handled in one of three ways. The first, and most obvious, is to simply rewrite the template in a script built with CDK. This approach is going to be the most accurate in mirroring the intention of your infrastructure engineers, but will also take the longest and is likely to be the most brittle. A second approach focuses on simply importing your existing Cloud Formation template definitions into your CDK application via the use of provided functionality to simply port the imported file into the final produced template configuration. This approach is by far the quickest way to get your infrastructure running on AWS CDK, but understandably it also does the least to position your developers for success by basically adding a wrapper around your existing template files. A third approach is to use a tool like the AWS CDK CloudFormation Disassembler to translate your CloudFormation templates into CDK-based code. This approach can greatly improve the speed of migrating your resources to AWS CDK, but is not without its own pitfall.

Know more practical knowledge at AWS Online Course

4 Tips for Becoming an AWS Certified DevOps Engineer

Amazon Web Services (AWS) started its certification program back in 2013. Fast-forwarding six years, these certifications have become one of the best assets an engineer can use to boost their career. According to 2018, IT Skills and Salary Report, 89% of IT professionals in 2018 (globally) had at least one certification, which is 3% more than in 2017. AWS exams are now available in multiple languages to cater to the global demand represented by numerous testing centres across the world.

AWS certification validates an engineer’s DevOps and cloud expertise with an industry-recognized credential — helping organizations identify and hire highly-skilled professionals to head their cloud initiatives on the AWS platform.

Become AWS Certified DevOps Engineer at DevOps Online Training

Advantages to getting AWS DevOps certified

AWS DevOps certification validates your technical expertise in operating, provisioning and managing distributed app systems on the AWS platform. It provides you with tangible advantages that showcase your accomplishments and further improve your AWS knowledge. Let us look at some of the benefits you can gain from being an AWS certified DevOps engineer:

  • Deep subject matter expertise around the AWS platform and AWS cloud functions
  • A better understanding of how DevOps teams can create robust systems efficiently and quickly with AWS
  • Invitations to regional appreciation receptions and access to AWS certification lounges at AWS events
  • Access to an exclusive AWS certified merchandise store and its numerous products
  • Practice exam voucher to help you prepare for your next AWS certification
  • Access to the AWS certified global community LinkedIn group
  • You can share your achievement on social media with an AWS certified logo

What do you need to know to become an AWS certified DevOps engineer?

There is a high demand for AWS certified DevOps engineers in the industry — and getting your own AWS DevOps certification can help you stand out from others in the crowd. Here are some tips that can help you ace the exam and boost your career.

Get more tips from real-time experts at AWS Online Course

1) Pre-requisites for the certification exam

The AWS DevOps certification is a professional level certification which caters to both developers and system operators — aka DevOps practitioners. You must complete the foundational level and associate level of AWS certifications before taking this exam, i.e. you should first be an AWS certified developer or AWS certified SysOps administrator. You must also know how to:

  • Set security controls and governance procedures
  • Handle and work with tools that help automate operational processes
  • Manage and implement continuous delivery systems and workflows on AWS
  • Define and deploy monitoring, metrics and logging systems on AWS
  • Develop code in at least one high-level programming language
  • Build highly automated infrastructures

You should be aware of AWS services like Compute and Network, Storage and CDN, Database, Analytics, Application Services, Deployment, and Management. You’ll also need to know how to effectively use auto-scaling, monitoring and logging in AWS. Two years of comprehensive experience in designing, operating and troubleshooting the solutions on AWS cloud is a bonus.

2) Exam format

The AWS certification exam includes questions in two formats — multiple-choice questions, and multiple response questions.

Every multiple-choice question covers a scenario-based problem that a DevOps person would’ve faced in the real world. These questions offer four or more potential solutions, with one correct answer.

In the multiple response questions, you have four or more options to choose from and you need to select two or more suitable answers since there can be multiple correct solutions.

Here are some sample questions for your reference.

You’ll need to pay $300 as a registration fee for the AWS DevOps certification exam and the test will have a time limit for 170 minutes. Here are the main topics and their weighted importance — this information should help you focus on learning the right things in preparation for the exam:

3) Reference materials

Here are some reference materials that can help you with the preparations:

Advanced operations on AWS course

Advanced architecting on AWS course

Whitepaper for running containerized microservices on AWS

Microservices on AWS whitepaper

Infrastructure as Code (IaC) whitepaper

Whitepaper for practising continuous integration and continuous delivery on AWS

Browse all of the AWS whitepapers

AWS also provides digital and classroom training to help DevOps teams learn best practices and tips when using AWS.

4) Evaluation process

The evaluation process of the AWS DevOps certification exam is based on industry best practices and guidelines. The scoring system has been established by AWS professionals.

You can score anywhere from 100–1000 with a minimum passing score of 750. AWS certification uses a compensatory scoring model, indicating that you don’t have to pass individual sections but you’ll need to get an overall score of 750 to pass. However, all unanswered questions in the examination are scored as incorrect and can affect your final score. Also, the AWS DevOps quiz includes unscored items that are included in order to gather statistical information. These items will not influence your results in any way.

Once the exam is completed, the system will automatically display your result. If you wish to retake the certification, you’ll have to wait 14 days for a 2nd attempt. Within 72 hours of passing the exam, an AWS certified e-certificate and digital badge will be credited to your AWS account where you could share on your social media profiles if you’d like to.

Know more tips from real-time experts at  AWS Online Training

Explain about Shared Responsibility Model

Security and Compliance is a shared responsibility between AWS and the customer. This shared model can help relieve the customer’s operational burden as AWS operates, manages and controls the components from the host operating system and virtualization layer down to the physical security of the facilities in which the service operates. The customer assumes responsibility and management of the guest operating system (including updates and security patches), other associated application software as well as the configuration of the AWS provided security group firewall.

Customers should carefully consider the services they choose as their responsibilities vary depending on the services used, the integration of those services into their IT environment, and applicable laws and regulations. The nature of this shared responsibility also provides the flexibility and customer control that permits the deployment. As shown in the chart below, this differentiation of responsibility is commonly referred to as Security “of” the Cloud versus Security “in” the Cloud.

Get practical knowledge on AWS from live experts at AWS Online Training


AWS responsibility “Security of the Cloud” – AWS is responsible for protecting the infrastructure that runs all of the services offered in the AWS Cloud. This infrastructure is composed of the hardware, software, networking, and facilities that run AWS Cloud services.

Customer responsibility “Security in the Cloud” – Customer responsibility will be determined by the AWS Cloud services that a customer selects. This determines the amount of configuration work the customer must perform as part of their security responsibilities. For example, a service such as Amazon Elastic Compute Cloud (Amazon EC2) is categorized as Infrastructure as a Service (IaaS) and, as such, requires the customer to perform all of the necessary security configuration and management tasks. Customers that deploy an Amazon EC2 instance are responsible for management of the guest operating system (including updates and security patches), any application software or utilities installed by the customer on the instances, and the configuration of the AWS-provided firewall (called a security group) on each instance. For abstracted services, such as Amazon S3 and Amazon DynamoDB, AWS operates the infrastructure layer, the operating system, and platforms, and customers access the endpoints to store and retrieve data. Customers are responsible for managing their data (including encryption options), classifying their assets, and using IAM tools to apply the appropriate permissions.

This customer/AWS shared responsibility model also extends to IT controls. Just as the responsibility to operate the IT environment is shared between AWS and its customers, so is the management, operation and verification of IT controls shared. AWS can help relieve customer burden of operating controls by managing those controls associated with the physical infrastructure deployed in the AWS environment that may previously have been managed by the customer. As every customer is deployed differently in AWS, customers can take advantage of shifting management of certain IT controls to AWS which results in a (new) distributed control environment. Customers can then use the AWS control and compliance documentation available to them to perform their control evaluation and verification procedures as required. Below are examples of controls that are managed by AWS, AWS Customers and/or both.

know more information with live examples at AWS Online Course

Design a site like this with WordPress.com
Get started